
Fresh out of the box, most lace units have a hairline that is dense, even, and starts in a suspiciously tidy line. Nobody’s hair grows like that. It is the detail that makes an otherwise beautiful wig read as a wig from across a room.
Plucking fixes it — and it is one of the highest-impact things you can do to a unit. It is also permanent, which is why it is worth understanding what you are aiming for before you pick up the tweezers.
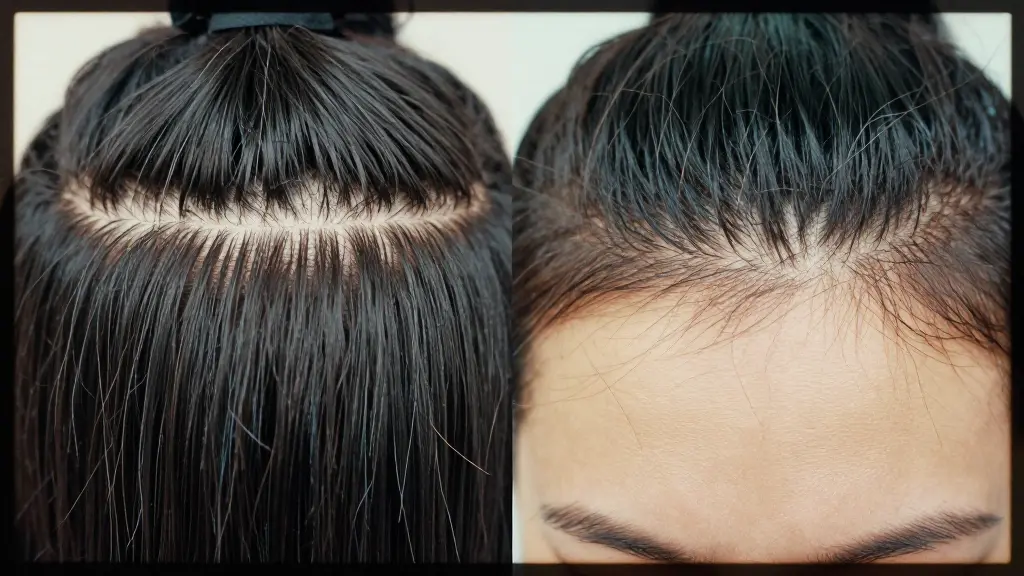
What a Real Hairline Actually Looks Like
Look closely at your own hairline, or a friend’s, and you will notice a few things.
Density increases gradually. The very front edge is sparse — a scattering of fine, short hairs. A centimetre or two back it thickens. Another centimetre and it reaches full density. There is no line where hair suddenly begins.
It is irregular. Real hairlines have gaps, uneven spots, a slight widow’s peak or a dip on one side. Perfect symmetry is a giveaway.
The hairs at the front are finer and shorter than the hair behind them.
It follows the shape of your face, dipping at the temples and curving rather than running straight across.
Your job when plucking is to recreate that gradient: sparse at the front, building to full behind. You are not removing hair evenly across the front — you are creating a fade.
What You Will Need
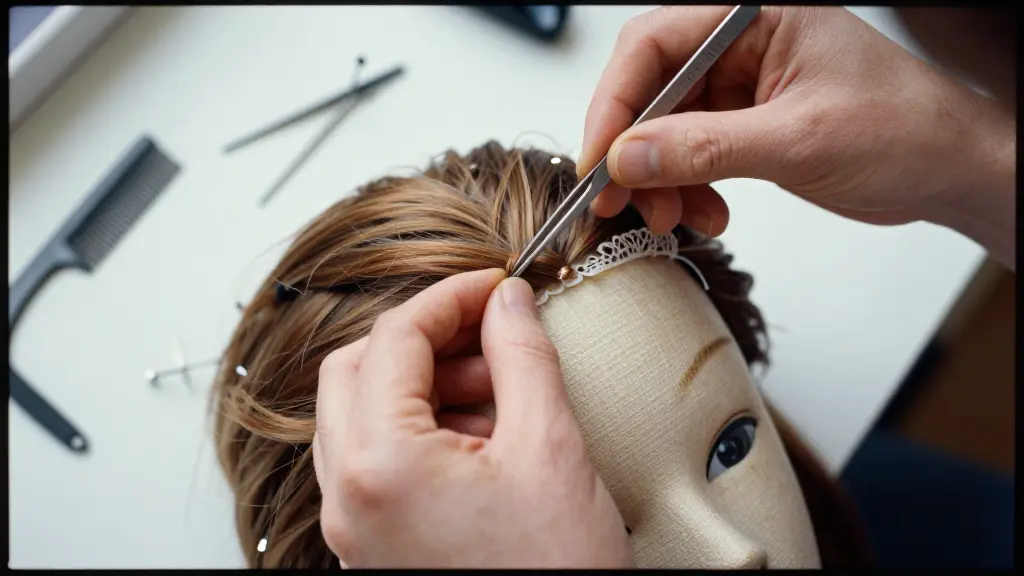
- Fine-point tweezers. Pointed tips, not slanted. Slanted tweezers grab several hairs at once, and precision is the whole point here.
- A mannequin head or wig stand, ideally one you can pin into. Plucking on your own head is possible but you cannot see what you are doing.
- T-pins to hold the wig taut.
- A rat-tail comb for sectioning.
- Sectioning clips.
- Bright, ideally natural light. Poor lighting is responsible for a lot of over-plucked hairlines.
- A hand mirror to step back and check.
Take your time on setup. A wig that shifts while you are working leads to uneven results.
Preparing the Wig
Pin the unit securely to the mannequin head, positioning it where it would sit on your own head. If the lace has not been cut yet, do the plucking first — it is easier to see what you are doing with the extra lace, and you can always trim afterward using our lace cutting guide.
Brush the hair back and clip everything away from the hairline except the front section you are working on.
Then use the rat-tail comb to section off a thin strip — about half a centimetre — along the very front edge. This is your working section. Clip the rest back so it does not distract you.
Plucking, Row by Row
Start at the very front edge. The frontmost row should end up the sparsest.
Pluck individual knots. Grip a single knot at its base where it meets the lace and pull in the direction the hair lies, with a quick steady motion. Yanking upward can damage the lace, which then becomes a repair job — see fixing torn lace if that happens.
Pluck randomly, not in a pattern. Skip a knot, take one, skip two, take one. If you pluck evenly spaced hairs, you get an evenly thinned hairline, which looks just as artificial as the dense one you started with. Irregularity is the goal.
Work along the whole width before going deeper. Do a light pass across the entire front row, then release the next thin section and do a lighter pass on that. The rows behind should have progressively fewer hairs removed until you are barely touching anything.
Stop and step back constantly. Every couple of minutes, put the tweezers down, move a metre away, and look at it. Damage happens when people work close-up for twenty minutes without checking. A hairline that looks barely touched at close range often looks perfect from conversational distance.
Do less than you think you need. This is the single most useful piece of advice on the subject. You can always pluck more tomorrow. You cannot put a knot back.
Shaping the Temples and Creating Irregularity
The temples are where you can do the most for realism. Most people have a slight recession there, so pluck a little more heavily at each corner, following the natural curve rather than keeping the front edge straight across.
Deliberately introduce some asymmetry. A slightly higher point on one side, a subtle widow’s peak, a small gap — these are the things real hairlines have and factory hairlines do not. Perfect mirror symmetry is one of the strongest tells.
Vary how deep you go. Pluck a little further back in one spot than another. Nature is not tidy.
Checking Your Work
Once you think you are close, do three checks.
Put the wig on. A hairline that looks right on a mannequin can sit differently on a real head. Wear it, look in a mirror, and assess.
Check in natural daylight. Bathroom lighting hides a lot.
Take a photo. A camera flattens things and shows you what other people see. Problems that are invisible in a mirror often jump out in a photo.
Look specifically for: a visible straight line where density begins, symmetrical patterns, bald patches from over-plucking one spot, and whether the front reads as fine and wispy or still blocky.
Finishing the Hairline
Plucking is one part of a natural front. Two more finish the job.
Baby hairs. Leave a small amount of the shortest, finest hair at the very front, or trim a few strands short yourself. Shaped softly rather than swooped dramatically, they break up the edge better than anything else. If they refuse to stay put, our guide to laying stubborn baby hairs covers it.
Tinting and melting. A lace tinted to match your skin, then pressed flat with a light-hold product and an elastic band while it sets, completes the illusion.
If you have also bleached the knots, note that bleached knots are more fragile and pull out more easily, so pluck before any lightening where possible, and go gently afterward.
If You Over-Pluck
It happens to nearly everyone at least once. The area looks patchy or the hairline has receded further than you intended.
Options, in order of how well they work: restyle so a fringe or a side-swept section covers the affected area; use a fine brow pencil or hair fibre powder on the lace to add the appearance of density; position the wig very slightly further forward so the sparse area sits at the hairline rather than behind it.
None of these are perfect. Which is really an argument for stopping earlier than you think you should.
If the idea of permanently altering a unit you have just bought is more stress than you want, plenty of wigs arrive with this work already done to a high standard. Flawless pre-plucked hairline wigs remove the risk entirely and are a sensible choice for a first lace unit, or for anyone who would rather spend the evening styling than tweezing.
Frequently Asked Questions
How long does it take to pluck a wig hairline?
Anywhere from thirty minutes to a couple of hours depending on the density you are starting with and how careful you are. Rushing is the main cause of over-plucking, so plan for it to take longer than you expect and stop when your concentration goes.
Should I pluck before or after cutting the lace?
Pluck first. The extra lace gives you something to hold and makes it easier to see the shape you are creating, and you can trim to the finished hairline afterward.
Can I pluck a synthetic wig hairline?
Yes, and the technique is identical. Synthetic knots can be a little more prone to pulling out in clumps, so grip closer to the lace and work more slowly.
How much hair should I remove?
Far less than most first-timers assume. You are creating a gradient, not thinning the whole front. Removing perhaps a quarter of the knots from the frontmost row, tapering to almost none by the third row, is a reasonable starting point.
Will plucking damage the lace?
It can, if you pull upward or repeatedly work the same small area. Pull in the direction the hair lies, use fine-point tweezers, and spread your plucking across the whole hairline rather than concentrating it in one spot.